
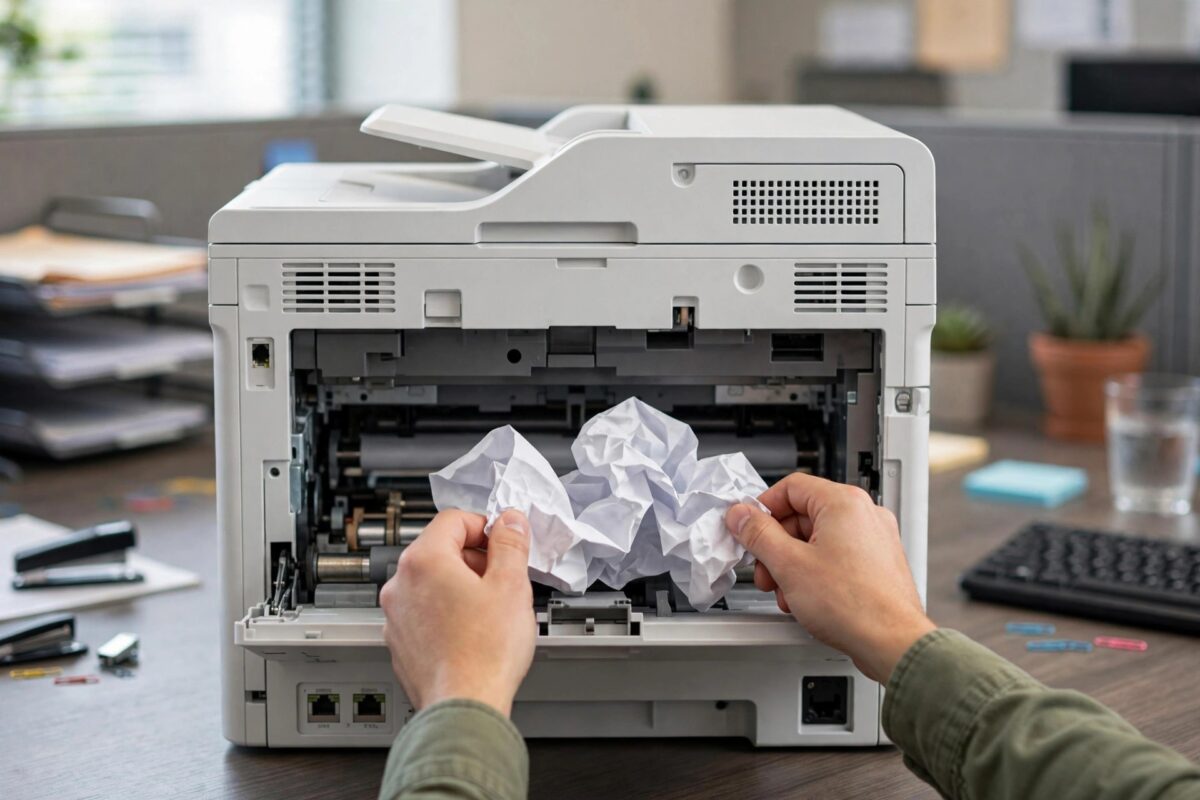
A paper jam is never welcome, but a jam at the back of a Brother MFC-L3780CDW is the one most people dread. The screen says the jam is in the rear or 2-sided area, the paper is not visible from the front tray, and the sheet seems to have vanished inside the machine near the hot fuser. Pulling from the wrong place or in the wrong direction can tear the sheet and turn a five-minute job into a long search for scraps.
The good news is that Brother designed this colour laser model with a wide rear cover specifically for this job. If you let the fuser cool, open the back correctly, and remove the paper slowly and evenly, most rear jams clear cleanly with no damage. This guide walks you through every step, plus the checks that stop the same jam happening again.
Quick Answer
To clear a paper jam in the back of a Brother MFC-L3780CDW, turn the printer off and let the fuser cool for 10 minutes, then open the rear cover, open the fuser cover using the green levers, and pull the jammed paper out slowly towards the back with both hands. Remove every torn piece, close the fuser and rear covers firmly, reload good paper correctly, and turn the printer back on to confirm the jam message has cleared.
Why Paper Jams at the Back of This Model
On the MFC-L3780CDW, printed pages pass through the fuser at the back of the machine, where heat and pressure bond the toner to the paper, before exiting. Paper that is going to cause trouble often survives the tray and the drum area and then fails at this final stage. Understanding the cause helps you prevent the next jam, not just clear this one.
Common Causes of Rear Jams
- Wrong paper weight or type: Thick card, labels, or envelopes fed from the main tray instead of the manual feed slot can stall in the fuser.
- Damaged or curled paper: Sheets with folded corners or curl from humidity crumple as they pass through the hot rollers.
- Worn or dirty rollers: Older rollers slip, so the timing the printer expects no longer matches the paper’s real movement.
Before You Touch the Back: Cooling and Safety
- Leave any jammed paper where it is for the moment. Do not yank it while the machine is hot and powered.
- Turn the printer off and unplug the power cord.
- Wait at least 10 minutes after printing before opening the back. If the printer had been printing heavily, wait longer.
- Remove the paper tray and set it aside so it does not block your access.
- Position yourself comfortably behind the printer with good light. Pull it forward on the desk rather than reaching awkwardly around it.
- Never use scissors, knives, or metal tools to lever paper out. Fuser rollers scratch easily and are expensive to replace.
Step-by-Step: Clearing the Jam From the Back
Step 1: Open the Rear Cover Fully
- Stand behind the printer and find the rear cover, which spans most of the back panel.
- Pull the rear cover down and open it fully. It hinges at the bottom and should stay open on its own.
- If you can see paper in the exit area at the top rear, note its position as well.
Step 2: Open the Fuser Cover
- Press or pull the green levers to release and open the fuser cover.
- Open it fully so the rollers and paper path are exposed. This releases much of the pressure on the jammed sheet.
- Do not touch the fuser roller surface itself, even when cool, as skin oils affect print quality.
Brother’s illustrated steps for this exact area are in the official MFC-L3780CDW manual and jam guidance, which is worth comparing with your machine if any lever looks different.
Step 3: Remove the Jammed Paper Slowly
- Grip the jammed sheet with both hands, one on each side, as close to the rollers as you comfortably can.
- Pull slowly and evenly towards the back of the printer, in the direction the paper would normally exit.
- If the paper is wrapped around the fuser roller, unwind it gradually in small movements rather than pulling straight.
- If the sheet does tear, note exactly where the remaining piece is before you continue.
- Do not pull paper back towards the front from this rear opening. Rear paper is removed from the rear.
Step 4: Check the 2-Sided (Duplex) Path
If the message mentioned 2-sided, check the duplex path too. With the rear cover open, look along the lower rear path where paper re-enters for the second side and remove any sheet or scrap with the same slow, even pull.
Step 5: Hunt for Every Scrap
- Run your torch along the full width of the fuser area, the rear rollers, and the exit path.
- Check the edges near the green levers and the sides of the paper path, where torn corners hide.
- Check the empty tray and tray cavity for fragments that fell down.
- If the sheet tore, piece the recovered parts together. They should form a whole sheet.
Step 6: Close Everything and Reload Paper
- Close the fuser cover first, pressing it until both sides click and the green levers return to their normal position.
- Close the rear cover firmly across its full width.
- Reinstall any drum and toner units you removed, in their original colour positions, and close the front cover.
- Discard all jammed and damaged paper. Never put a sheet that has been through the fuser back into the tray.
- Slide the tray back in, plug in the printer, and turn it on.
If you regularly print thick or special media, our guide to using the manual feed slot on Brother laser printers explains which media should never go through the main tray.
Step 7: Confirm the Jam Is Truly Cleared
When the printer restarts and shows Ready, print a single test page, then a short double-sided document to test the rear path together. Check the output for wrinkles or smudges, which can suggest a scrap remains.
If the Jam Message Will Not Clear
- Turn the printer off, unplug it for 60 seconds, and restart it so the sensors are re-checked.
- Check the front and tray areas again. The printer sometimes reports the last detected location, while the remaining scrap is elsewhere.
- Look for a piece of paper sitting directly on a sensor in the rear path.
- If the message persists with a completely empty paper path, a sensor may have failed. Contact Brother’s official support service rather than forcing the printer to run.
Common Mistakes That Damage the Printer
- Pulling hard and fast: This is the number one cause of torn paper and broken sensor flags. Slow and even always wins.
- Opening the back while the fuser is still hot: Besides the burn risk, rushed work on hot rollers leads to tears.
- Reaching in with tools: Tweezers and screwdrivers scratch fuser rollers, creating a permanent mark on every future print.
- Forgetting the fuser cover: Leaving it unlatched causes an instant repeat error.
- Reusing jammed paper: A sheet that looks fine may have a folded edge that will jam again at the same place.
- Skipping the scrap hunt: If the recovered sheet is not whole, the missing part is still inside and must be found.
Tips to Prevent Rear Jams
- Store paper flat in its wrapper in a dry place, and load only what you need in a humid office.
- Keep the tray guides set correctly after every refill, even if the paper size has not changed.
- Clean the paper feed rollers with a barely damp lint-free cloth every few months.
- Let heavy double-sided jobs run in smaller batches if the printer is in a very warm room.
Conclusion
Clearing a jam from the back of a Brother MFC-L3780CDW is a calm, methodical job: cool the fuser, open the rear and fuser covers, pull the sheet out slowly towards the back with both hands, and account for every torn piece. Close the covers firmly, reload fresh paper with the guides set correctly, and prove the fix with a single-sided and a double-sided test page. Done this way, a rear jam costs you ten minutes and no parts.
Frequently Asked Questions
How long should I wait for the fuser to cool before opening the back?
Wait at least 10 minutes after the printer was last printing. The fuser reaches very high temperatures, and the rear area can burn skin. If you had just printed a long job, waiting 15 to 20 minutes is safer.
The paper tore and a piece is still inside. How do I get it out?
Keep the fuser cover open and use a torch to locate the piece. Grip its exposed edge with your fingers and work it out slowly in the direction of normal paper travel. Never use metal tools. If you cannot reach it safely, arrange service rather than forcing it.
Why does my printer say Jam 2-sided when the jam looks like it is at the back?
On this model the rear path and the 2-sided path overlap. During duplex printing, paper passes through the back of the machine to be flipped for the second side, so a jam there is reported as a 2-sided jam. Check both the fuser area and the lower duplex route.
Can the wrong paper type setting cause rear jams?
Yes. If the driver is set to plain paper while you print thick card, the printer uses settings for thin paper, and the sheet can stall or fold at the fuser. Match the driver media type to the actual paper, and feed heavy media through the manual feed slot.
My printer still shows a jam after I removed all the paper. Is the sensor broken?
Not necessarily. First re-close the fuser and rear covers firmly, check the tray and front areas for a hidden scrap, and restart the printer after a 60-second power disconnect. If the message remains with a verifiably empty paper path, a damaged sensor is possible and Brother support should inspect it.
Leave a Reply