
Few printer messages cause as much confusion as a Brother drum error. One day the printer works fine, the next day it shows “Replace Drum”, “Drum End Soon”, or “Drum Error” and may refuse to print, even though the last pages looked perfect. Many users replace an expensive drum unit straight away, while others keep resetting the counter without checking the drum at all. Both approaches can waste money.
This guide explains what the drum does, what each drum message really means, how to tell a worn drum from a dirty or poorly seated one, and how to reset the drum counter correctly — but only at the right time.
Quick Answer
A Brother drum error means the printer believes the drum unit is dirty, damaged, incorrectly installed, or has reached the end of its counted page life. Clean the corona wire, reseat the drum and toner firmly, and check print quality first. Only reset the drum counter after you install a genuinely new drum unit, because the reset tells the printer to start counting pages from zero again.
What Is the Drum Unit and Why Does It Matter?
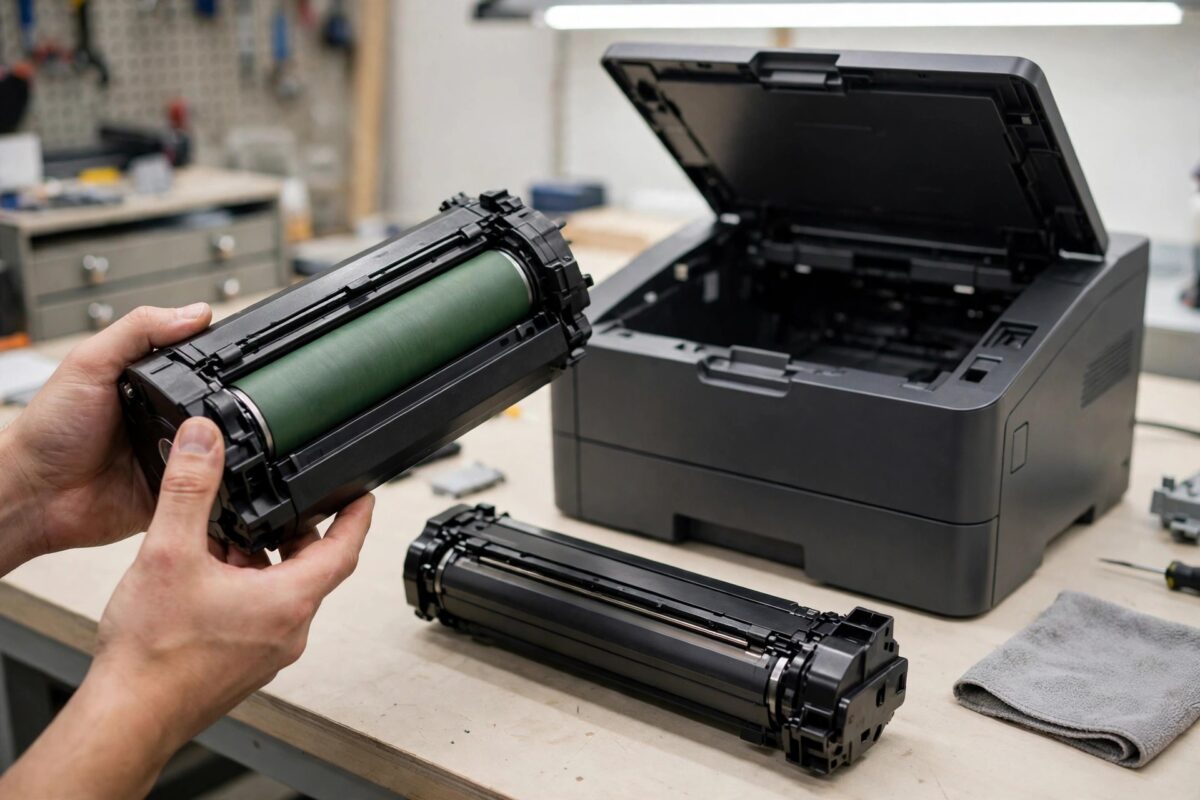
The drum unit is the part that transfers the image onto paper. Inside most Brother laser printers, the toner cartridge sits inside or clicks onto a separate drum unit. The drum itself is a smooth cylinder, usually green or blue, with a special light-sensitive coating. The printer draws the page image onto the drum, toner sticks to that image, and the drum then rolls the toner onto the paper.
Because the drum and toner are separate on many Brother models, they wear out at different rates. A toner cartridge might last 1,200 to 3,000 pages, while a drum unit might be rated for 12,000 to 30,000 pages depending on the model. That is why you can replace toner several times before the printer asks for a new drum.
Drum Unit vs Toner Cartridge
- Toner cartridge: Holds the toner powder. Replaced when pages fade because toner is low or empty.
- Drum unit: Holds the imaging cylinder and corona wire. Replaced when print quality drops in repeating patterns or the counted life ends.
- Combined units: A few models combine both parts. On those models, replacing the cartridge also replaces the drum, and the reset process is different.
Check the manual for your exact printer before buying parts or following a reset sequence meant for another model.
What the Different Brother Drum Messages Mean
Drum End Soon or Drum Life End Soon
This is a warning, not a failure. The counter is close to the rated drum life and you can usually keep printing. Order a new drum ready, watch quality for lines or spots, and do not reset the counter while keeping the old drum.
Replace Drum
The counter has reached its limit. Some models keep printing, others stop until you act. If print quality has dropped, replace the drum and then reset the counter. If quality is still clean, the drum may have a little useful life left.
Drum Error or Drum Unit Error
This usually points to a fitting, dirt, or contact problem rather than wear. Common triggers are a drum not seated fully, toner not clicked in correctly, a dirty corona wire, or dust on the metal contacts. It can appear even on a brand-new drum.
Slide the Green Tab or Clean the Corona Wire
This is a cleaning instruction. Toner dust on the corona wire causes lines and errors. Slide the green or blue tab back and forth to clean the wire, then return the tab to its home position or the error will remain.
How to Diagnose a Drum Error Before Spending Money
Do these checks in order. They take about ten minutes and often clear the error without any new parts.
Step 1: Print and Inspect a Test Page
- Print a test page from the printer menu if the machine allows it.
- Look for repeating spots or lines. Marks that repeat at regular intervals often point to the drum surface.
- Check whether fading is even across the page. Even fading usually means low toner, not a drum fault.
Step 2: Reseat the Drum and Toner
- Turn the printer off and open the front cover.
- Pull out the drum and toner assembly by its handle and place it on clean paper.
- Check that no packing material or protective cover remains on a new unit.
- Slide the assembly back into the printer evenly until it clicks, then close the cover firmly.
Our detailed walkthrough on replacing a Brother drum unit correctly step by step shows the seating checks in more detail if your model has a tricky front cover.
Step 3: Clean the Corona Wire Properly
- With the drum assembly out of the printer, find the green or blue tab on the drum unit.
- Return the tab to its home position, aligned with the small arrow or mark. This step is essential.
- Repeat for each colour drum on a colour model if the error names a specific colour.
Step 4: Check Contacts and the Drum Surface
With the printer off, wipe toner from the metal contacts on the drum unit with a dry, lint-free cloth. Look at the drum cylinder without touching it. Deep scratches, chips, or a dull worn patch mean the drum should be replaced.
How to Reset the Drum Counter
The exact button sequence differs by model family. The two methods below cover most Brother printers. Always confirm the sequence for your exact model in the official Brother manual library for drum and toner reset instructions, because using the wrong menu can reset the wrong counter.
Method A: Printers With a Touchscreen
- Install the new drum unit and close the front cover.
- Make sure the printer is turned on and shows the drum message.
- Press Settings, then All Settings, then Machine Info, then Parts Life.
- Press and hold the drum life entry until the reset option appears.
- Select Reset and confirm Yes. The drum life should return to 100 percent.
Method B: Printers With Buttons and a Small Display
- Select Drum from the list using the arrow keys.
- Press 1 or OK to confirm the reset for a new drum.
After the reset, print five to ten normal pages and inspect them. A new drum may need a few pages for print quality to settle. Recycle the old drum through a toner recycling programme rather than putting it in household waste.
Common Mistakes That Make Drum Errors Worse
- Touching the drum surface: Fingerprints and scratches create permanent marks on every page.
- Installing toner without locking it in: A loose cartridge creates contact errors that look like drum failures.
- Resetting the toner counter instead of the drum counter: The menus look similar. Double-check you selected Drum before confirming.
When You Really Do Need a New Drum
Replace the drum when print quality shows repeating defects that cleaning does not fix, when the drum surface is visibly scratched or worn, or when the Replace Drum message returns soon after a correct cleaning and reseating. Age alone is a weaker reason than quality: a lightly used printer may produce clean pages past its counted life for a short time, while a printer in a dusty office may need a drum earlier. Guidance on yields and part numbers is available on Brother’s official support site for your printer model.
Tips to Make Your Next Drum Last Longer
- Keep the printer in a clean, dry room away from direct sunlight.
- Use good quality plain paper. Rough or dusty paper wears the drum faster.
- Clean the corona wire whenever you change toner, not only when an error appears.
- Avoid opening the front cover unnecessarily, which exposes the drum to light.
- Print regularly. Long idle periods in humid conditions are harder on drums than steady light use.
Conclusion
A Brother drum error is information, not an automatic instruction to buy a new drum. Start by understanding the exact message, cleaning the corona wire, reseating the drum and toner, and judging the printed page. Replace the drum when quality or visible damage confirms it is worn, and only then reset the drum counter using the correct sequence for your model. That simple order saves money, prevents surprise failures, and keeps print quality consistent.
Frequently Asked Questions
Can I reset the drum counter and keep using the old drum?
You can on many models, and the message will clear, but it is not recommended as a long-term fix. The printer will no longer warn you as the drum wears further, and print quality can drop suddenly. If you do it as a short test, note the page count so you remember the drum is overdue.
How many pages should a Brother drum last?
It depends on the model. Small home printers often rate drums at around 12,000 pages, while office models may rate them at 25,000 to 30,000 pages or more. Heavy coverage and poor paper can shorten real life compared with the rating.
Why does my new drum still show a drum error?
The most common reasons are the toner not clicked fully into the new drum, the corona tab not returned to its home position, a protective strip left in place, or the counter not yet reset. Turn the printer off, reseat everything, clean the wire, and then perform the reset.
What happens if I never reset the drum counter after replacing the drum?
The printer will keep showing Replace Drum based on the old count, and some models will eventually stop printing, even though the fitted drum is new. The reset is part of the replacement job, so always complete it straight after installation.

Leave a Reply